By Jim Sprouse, Co-founder of Ember Pro
When a wildfire approaches, most people picture walls of flame consuming everything in their path. But the truth is, the majority of homes lost in wildfires are ignited not by direct flame contact but by embers. These small, burning fragments can travel a mile or more ahead of the fire front, carried by wind and convection currents. They land on roofs, lodge in gutters, and—most critically—enter homes through openings that most homeowners never think about: their vents.
Ember resistant vents are one of the single most important upgrades you can make when hardening your home against wildfire. In this guide, we will cover why vents are so vulnerable, what your options are, how to approach vent hardening as a DIY project or with professional help, and how this work fits into California’s evolving regulatory and insurance landscape.
Editor’s note: Your insurance situation depends heavily on your property’s actual fire exposure. Our free risk assessment factors in official CAL FIRE data to show what your risk level actually is — useful context before talking to your carrier.
Why Vents Matter in a Wildfire
Every home has vents. Attic vents, soffit vents, foundation vents, ridge vents, dryer vents, and more—these openings are designed to let air circulate through your home’s structure, preventing moisture buildup and regulating temperature. But during a wildfire, those same openings become entry points for wind-driven embers.
When embers enter an attic or crawlspace through an unprotected vent, they land on dry, combustible materials: wood framing, insulation paper backing, dust, and debris. In many cases, the fire starts inside the structure before flames ever reach the exterior. This is why post-fire damage assessments so often show homes that burned from the inside out, even when the surrounding vegetation was properly cleared.
According to research from the Insurance Institute for Business & Home Safety (IBHS), ember intrusion through vents is one of the top three causes of home ignition during wildfire events. Upgrading to ember resistant vents directly addresses this vulnerability and significantly improves your home’s chances of surviving a wildfire.
The Problem With Older Vent Screens
Many homes, especially those built before California’s updated building codes took effect, have vent screens made from 1/4-inch mesh or larger. A 1/4-inch opening is more than large enough for burning embers to pass through. Even 1/8-inch mesh, which meets current California Chapter 7A building standards for new construction, can allow very small embers to enter under extreme wind conditions.
Material also matters. Some older vents use plastic or fiberglass screening, which can melt or burn when exposed to radiant heat or direct ember contact. Once the screen material fails, the vent opening is completely unprotected. Metal mesh—specifically galvanized steel, stainless steel, or bronze—is essential for any vent intended to resist ember intrusion.
If your home has original vent screens that have never been upgraded, there is a high probability that your vents are one of the weakest links in your home’s wildfire defense.
1/16-Inch Mesh vs. 1/8-Inch Mesh
California’s Chapter 7A building code requires vents in the Wildland-Urban Interface (WUI) to have metal mesh screening no larger than 1/8 inch. This standard was a significant improvement over the old 1/4-inch requirement, but research continues to show that 1/16-inch mesh provides meaningfully better ember protection.
The tradeoff is airflow. Finer mesh restricts ventilation more than coarser mesh, which can affect moisture management in attics and crawlspaces. For this reason, some builders and code officials have been cautious about mandating 1/16-inch mesh universally. However, the wildfire protection benefit of the finer mesh is well documented, and many fire-hardening professionals—including our team at Ember Pro—recommend 1/16-inch mesh whenever airflow can be maintained through proper vent sizing or additional vent openings.
If you are retrofitting existing vents, consider whether your current ventilation is adequate. In some cases, adding supplemental vents with 1/16-inch mesh can offset any airflow reduction while dramatically improving ember resistance.
Mesh Retrofits vs. Intumescent Vents
There are two primary approaches to making your vents ember resistant:
Mesh Retrofits
The most common and cost-effective approach is to retrofit existing vents with fine metal mesh. This can be done by attaching 1/16-inch or 1/8-inch galvanized steel or stainless steel mesh over or behind the existing vent cover. Mesh retrofits are straightforward for most homeowners and can be completed in a weekend with basic tools. The key is ensuring full coverage with no gaps at the edges where embers could bypass the screen.
Intumescent Vents
Intumescent vents represent a more advanced technology. These vents contain a material that expands (intumesces) when exposed to heat, physically sealing the vent opening when temperatures reach approximately 160 to 200 degrees Fahrenheit. During normal conditions, the vent allows full airflow. When a wildfire approaches and ambient temperatures rise, the intumescent material swells to close the opening entirely, blocking all ember entry.
Intumescent vents are more expensive than mesh retrofits—typically $30 to $80 per vent compared to $5 to $15 for mesh screening material—but they provide a higher level of protection because they eliminate the opening entirely during a fire event. Products from manufacturers like Vulcan Vents and Brandguard Vents are specifically designed for wildfire-prone areas and meet or exceed California building standards.
For maximum protection, some homeowners combine both approaches: installing intumescent vents with fine mesh backing as a secondary barrier.
Every Vent Counts
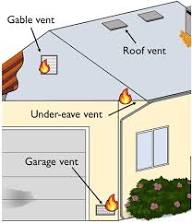
One of the most common mistakes homeowners make is hardening only the vents they can easily see or reach while overlooking others. A comprehensive vent hardening program must address every vent on and around the structure. Here is a complete list of vent types that need attention:
- Attic vents — typically located on gable ends or in the roof deck
- Gable vents — large triangular or rectangular vents at the peaks of gable walls
- Eave vents — located along the underside of the roof overhang
- Soffit vents — continuous or individual vents in the soffit panels
- Foundation vents — screened openings in the foundation wall for crawlspace ventilation
- Crawlspace vents — similar to foundation vents, sometimes located at grade level
- Ridge vents — continuous vents running along the peak of the roof
- Roof vents — box vents, turbine vents, or powered vents on the roof surface
- Dormer vents — vents associated with dormer window structures
- Dryer vents — exhaust vents for clothes dryers, usually on exterior walls
- Garage vents — ventilation openings in attached or detached garages
Missing even one unprotected vent can undermine your entire hardening effort. Embers are opportunistic—they will find the weakest entry point.
DIY Vent Hardening: What Homeowners Can Do
Many vent hardening tasks are well within the capability of a motivated homeowner. Here is a step-by-step process for a basic mesh retrofit:
- Inventory all vents. Walk around your entire home, including the roof. Document every vent type, location, and current screen condition. Take photos for reference.
- Measure each vent opening. Record the dimensions so you can cut mesh panels to size. Add at least 1 inch of overlap on each side for secure attachment.
- Purchase appropriate mesh. Use 1/16-inch or 1/8-inch galvanized steel or stainless steel mesh. Avoid aluminum (it melts at lower temperatures) and any non-metal screening.
- Cut mesh panels to size. Use tin snips or aviation shears. Wear gloves—cut mesh edges are sharp.
- Attach mesh over or behind existing vent covers. Use corrosion-resistant screws, staples, or metal clips. Ensure there are no gaps between the mesh and the vent frame. Seal edges with high-temperature caulk if needed.
- Inspect for gaps and weak points. After installation, check every vent from both inside and outside. Look for areas where wind could push embers around the mesh edges.
- Document your work. Take before-and-after photos of every vent. This documentation is valuable for insurance purposes, home sale disclosures, and compliance verification.
For ridge vents and roof vents, work safely. Use proper fall protection equipment or hire a professional if you are not comfortable working on a roof.
When DIY Is Not Enough
While mesh retrofits are manageable for many homeowners, some situations call for professional installation:
- Steep or high roofs where ridge vents and roof vents cannot be safely accessed
- Intumescent vent installation that requires removing existing vents and properly fitting new units
- Homes with non-standard vent configurations or custom architectural features
- Properties where compliance documentation must meet specific insurer or inspector requirements
- Older homes with deteriorated framing around vent openings that need structural repair before new vents can be installed
At Ember Pro, we assess every vent on a property as part of our home hardening inspections. We identify which vents can be retrofitted with mesh, which should be replaced with intumescent units, and which need structural work before any upgrade is possible.
Vents Are Home Hardening, Not Defensible Space
There is an important distinction that many homeowners—and even some contractors—confuse. Vent hardening is a home hardening measure, not a defensible space measure. Defensible space refers to the management of vegetation and combustible materials in the area surrounding your home, typically within 100 feet of the structure. Home hardening refers to modifications made to the structure itself to make it more resistant to ignition.
This distinction matters for several reasons. California’s AB 3074 and related wildfire laws establish separate requirements for defensible space and home hardening. Insurance companies evaluate them independently when assessing your property’s wildfire risk. And from a practical standpoint, you need both: clearing vegetation without hardening your vents leaves your home vulnerable to embers that travel far beyond your defensible space perimeter.
For a deeper explanation of these two categories and how they work together, see our guide on the difference between home hardening and defensible space.
Common Vent Hardening Mistakes
Even well-intentioned homeowners can make errors that reduce the effectiveness of vent hardening. Here are the six most common mistakes:
- Using the wrong mesh material. Plastic, fiberglass, and aluminum screening will fail under wildfire conditions. Only galvanized steel, stainless steel, or bronze mesh should be used.
- Leaving gaps at mesh edges. If the mesh does not fully seal the vent opening with adequate overlap, embers can enter around the edges. Every edge must be secured.
- Forgetting hidden vents. Crawlspace vents, eave vents, and dormer vents are easy to overlook. A single unprotected vent can compromise the entire effort.
- Blocking airflow entirely. Sealing vents shut might seem like good protection, but it creates moisture problems that can lead to mold, rot, and structural damage. Vents must remain functional for airflow while blocking embers.
- Ignoring maintenance. Even properly installed mesh can become clogged with debris, paint overspray, or insect nests over time. Inspect your vent screens annually and clear any obstructions.
- Not documenting the work. Without photos and records, you cannot prove to insurers or inspectors that your vents have been hardened. Documentation is essential for compliance verification and insurance benefit.
How This Helps With Insurance Conversations
One of the most practical reasons to harden your vents—and to document the work thoroughly—is the impact on your homeowners insurance. California’s insurance market for wildfire-prone properties has been in crisis for years, with major carriers non-renewing policies and premiums skyrocketing for those who can still obtain coverage.
Insurance companies increasingly evaluate specific home hardening measures when deciding whether to write or renew a policy. Vent hardening is one of the items on virtually every insurer’s wildfire risk checklist. Having documented, compliant ember resistant vents can:
- Help you qualify for coverage from carriers that might otherwise decline your property
- Support premium reductions or discounts for wildfire mitigation
- Strengthen your position if you need to appeal a non-renewal decision
- Provide evidence of proactive risk reduction for FAIR Plan transition strategies
Keep your before-and-after photos, receipts for materials or professional installation, and any inspection reports in a file you can share with your insurance company. The more thorough your documentation, the stronger your case.
Where Vent Hardening Fits in the Bigger Picture
Vent hardening is one component of a layered wildfire defense strategy. It works alongside other home hardening measures—such as ember-resistant roofing, tempered glass windows, non-combustible siding, and enclosed eaves—to make your structure as ignition-resistant as possible.
At the property level, defensible space reduces the fuel available to carry fire toward your home. Integrated fire defense systems can provide active suppression capability during a fire event. And at the community level, Zone 0 standards and neighborhood-wide mitigation efforts create cumulative protection that benefits every property in the area.
No single measure is sufficient on its own. But among all the structural hardening upgrades you can make, ember resistant vents consistently rank among the highest-impact, most cost-effective improvements. For a few hundred dollars in materials—or a few thousand with professional installation and intumescent vents—you can close one of the most dangerous pathways fire uses to enter your home.
Frequently Asked Questions About Ember Resistant Vents
What are ember resistant vents?
Ember resistant vents are vent covers or screens designed to prevent wind-driven embers from entering a building through its ventilation openings. They use fine metal mesh (typically 1/16-inch or 1/8-inch) or intumescent materials that seal shut when exposed to heat.
What mesh size is best for ember protection?
Research shows that 1/16-inch mesh provides the best protection against ember intrusion. California building code (Chapter 7A) requires 1/8-inch mesh as a minimum in WUI zones, but 1/16-inch mesh is recommended for higher-risk areas.
What are intumescent vents and how do they work?
Intumescent vents contain a material that expands when heated to approximately 160-200 degrees Fahrenheit, physically sealing the vent opening. During normal conditions, they allow full airflow. During a wildfire, they close automatically to block all ember entry.
How much do ember resistant vents cost?
Mesh retrofit materials cost approximately $5 to $15 per vent. Intumescent replacement vents range from $30 to $80 per unit. Professional installation adds labor costs but ensures proper fit and compliance documentation.
Can I install ember resistant vent mesh myself?
Yes, mesh retrofits are a manageable DIY project for most homeowners. You need tin snips, corrosion-resistant fasteners, and appropriate mesh material. Roof-level vents may require professional help for safety reasons.
Will finer mesh reduce airflow in my attic?
Yes, finer mesh does reduce airflow compared to coarser mesh. However, this can be offset by increasing the total vent area or adding supplemental vents. Adequate ventilation must be maintained to prevent moisture problems.
Does California require ember resistant vents?
California Chapter 7A requires 1/8-inch metal mesh on vents for new construction and major retrofits in fire hazard severity zones. Local jurisdictions may have additional requirements. AB 3074 and related legislation continue to strengthen vent standards.
How often should I inspect my vent screens?
Inspect vent screens at least once a year, ideally before fire season. Check for damage, corrosion, debris accumulation, insect nests, and gaps where mesh may have pulled away from the frame.
Do ember resistant vents help with insurance?
Yes. Many insurance companies include vent hardening on their wildfire risk assessment checklists. Documented ember resistant vents can help you qualify for coverage, receive premium discounts, or support a non-renewal appeal.
What is the difference between vent hardening and defensible space?
Vent hardening is a home hardening measure—a modification to the structure itself. Defensible space refers to managing vegetation and combustible materials in the area surrounding your home. Both are necessary for comprehensive wildfire protection, but they are evaluated separately by insurers and regulators.
Conclusion
Ember resistant vents are not glamorous. They do not look dramatic in photos, and they are easy to overlook when planning wildfire protection improvements. But they address one of the most critical vulnerabilities in residential construction: the openings that allow wind-driven embers to enter your home and start a fire from the inside.
Whether you choose a simple mesh retrofit or invest in intumescent vent technology, hardening every vent on your home is one of the highest-return investments you can make in wildfire preparedness. Combined with proper defensible space, structural hardening, and thorough documentation, vent upgrades bring you significantly closer to a home that can withstand the ember storm that precedes every major wildfire.
At Ember Pro, we help California homeowners identify, prioritize, and complete the hardening work that makes the biggest difference. If you are not sure where your vents stand or what upgrades make sense for your property, contact us for a comprehensive home hardening assessment.
Curious about your property’s actual wildfire risk? Our free calculator shows your CAL FIRE zone, exposure level, and recommended next steps based on your address.
Get your free risk scoreReferences
- Insurance Institute for Business & Home Safety (IBHS) — Wildfire Research: Ember Intrusion and Vent Vulnerability Studies
- California Building Standards Commission — Title 24, Chapter 7A: Materials and Construction Methods for Exterior Wildfire Exposure
- CAL FIRE — Defensible Space and Home Hardening Guidelines
- California Assembly Bill 3074 (2020) — Ember-Resistant Zone and Zone 0 Standards
- National Fire Protection Association (NFPA) — Firewise USA: Preparing Homes for Wildfire
- Vulcan Vents — Technical Specifications for Intumescent Vent Products
- Brandguard Vents — Wildfire Vent Testing and Certification Data
- University of California Agriculture and Natural Resources — Vent Screening Research for Wildfire Protection